Configure any notifications that should be sent for each merged document.
This section will show how to create a project and how each step within a project can be configured.
Project Listing
A Project Card
Projects are listed on the Projects page as a card. Each project will show it's name and description and buttons you can use to act upon the project
The Project Action Menu provides quick access to each steps configuration page
The Process Summary shows the four main steps of the project. Each icon can be clicked to open the relevant settings. Hover over the icon to see a quick summary of the step.
Projects need to be started before they will generate documents. Click this button to start and stop a project.
Create a Project
Create a new project
Click on the New Project button to open the New Project form
New Project Form
Enter a name for your project
Choose a color to customize the look of the project on the listing page
Enter a description for the project
Choose whether to create your project by:
Uploading a Word Document with variables already in it. This will create the Data Table from the variables and use the word document as the Document Template.
Uploading a CSV file. This will create the Data Table using the first row as column names, and will populate it with data if there are more rows. You will need to upload a Document Template in the next step.
Choosing an Existing Data Table*. You can upload a new Document Template in the next step. This will effectively let you create multiple documents from the one Data Table.
The easiest way to create a new project, document template and data table at the same time is to import a Word document with placeholder variables already in it. Check out the Quick Start Guide to see an example of how this works.
* Note: more than one Project can use the same Data Table, allowing you to create multiple documents from the same data. Select the Choose an Existing Data Table option when creating a new project, and then select a Data Table.
Navigating a Project
Project Navigation Menu
Each step of the project is displayed at the top as navigation links
You can also click Back or Next to move through the steps
Step 1 - Data
Step 1 - Data
The main data table for the project is displayed, showing the rows of data that the project will process
Use data table Action Button to edit the data table if required. Important: Any changes to the data table will effect all projects using this data table. Data Table Actions
The Row Status column shows which rows have been generated by this Project. Each project keeps its own record rows generated, allowing you to use data tables across multiple projects.
Related Data Tables are shown at the bottom.
See the Data Tables page for more information on editing data tables.
Step 2 - Pre-process Template
This section will show you how to configure a pre-process template. To learn more about how to create pre-process templates in Excel, see the Understanding Pre-process Templates page.
Enable the Pre-process step
The Pre-process step is optional. Click to enable.
Choose the pre-process spreadsheet
Upload a new spreadsheet from your computer; or
Use an existing spreadsheet from your MergeOS folder
Uploading a new spreadsheet
Choose the Folder within your account to save the spreadsheet.
Click to Choose a file by browsing your computer
Mapping Variables
Pre-process templates require you to map the columns in your data tables to the cells in the spreadsheet. When the Project processes a new row of data, it will automatically copy the data to the mapped cells, and then run Excels cell calculation.
Data Table to Excel mapping
Named Ranges and Excel Tables from the Excel spreadsheet display on the left. Note the icon to differentiate between an Excel Table and a Named Range.
Data Table Columns display on the right
Mapping an Excel Table Mapping an Excel Table to a related Data Table
Select the related data table in the right-hand column
The columns of the Excel Table will display, allowing you to choose the matching column from the related data table
Excel Tables map to Related Data Tables. You will need a related data table to do the mapping. Named Ranges map to columns in the Main Data Table.
Saving the Generated Excel File
You can choose to save the generated pre-process template after the project merges the data to it. If you want to email the generated Excel file, you need to enable this here.
Save the generated pre-process template
Click to enable saving of the generated template
Choose the folder you would like to save the file to
Enter a file name for the file. Don't enter the file extension, we'll add that automatically.
You can use variables from the data to dynamically name the file
Output Variables
You can define named ranges within an Excel pre-process template as Output Variables. This means the value in that Named Range will be available to use in your Document Templates.
Output Variables
Click on an Output Variable to copy the code to your clipboard. You can then paste this into your Document Template and MergeOS will automatically replace the code with the value from the calculated Excel file.
Step 3 - Document Template
This step allows you to upload a MS Word document to use as a template for your generated document. To read more about how to format and create one, read the Understanding Document Templates page.
An empty Document Template step
Click Upload Word Template to add a new document template from your computer
Click Use Existing Template to use an existing template from your MergeOS account
Document Template Settings
Use the Action Button to download, remove or change the current document template
Choose a folder to save the generated document to
Enter a file name for the generated document. You can click the variable (</>) button to give the file a dynamic file name using the columns from the row being processed
Choose the format for the generated file. This can be PDF, MS Word or both. If you want to attach the file to an email, you must choose the file type you want to attach.
Enter your email address to run a test merge. The generated document will use the first row of data and email you the results.
Step 4 - Send Notifications
On this step you can configure email notifications to be sent after each document has been generated.
Add Notification
Click on Add a Notification to open the notification editor
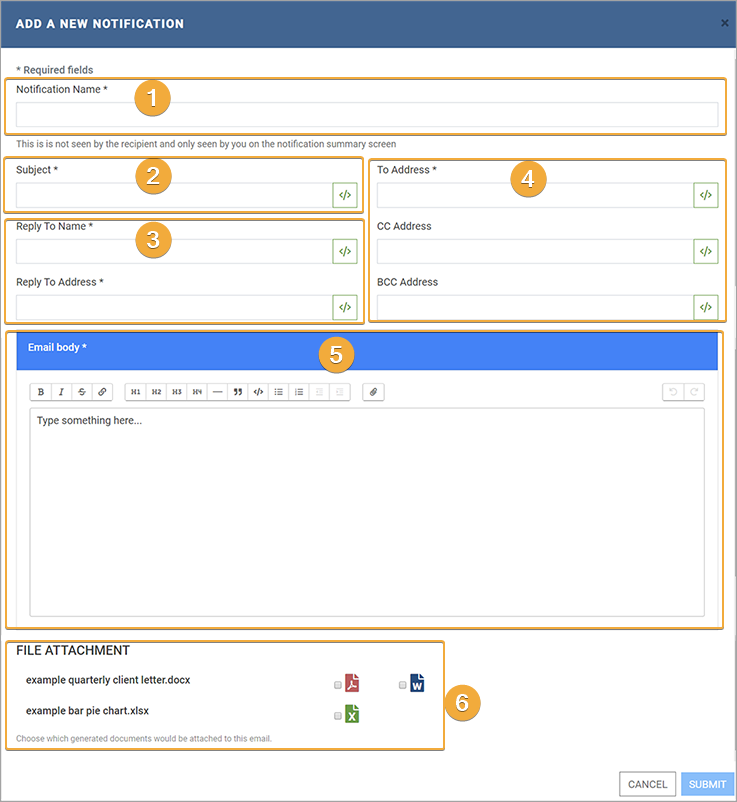
Email Notification
Enter a Name for the notification. This is only seen by you in the configuration pages.
Enter the Email Subject
Enter the Reply to Name - This should be your company name, or your name. This is what the recipient will see in their email program
Enter the Reply to Address - This is the email address you would like to receive replies from
Enter the Body of the email.
Choose the Attachments to send with the email
All the fields with the variable button ( </> ) and the body field can accept variables from the data to make the email dynamic.
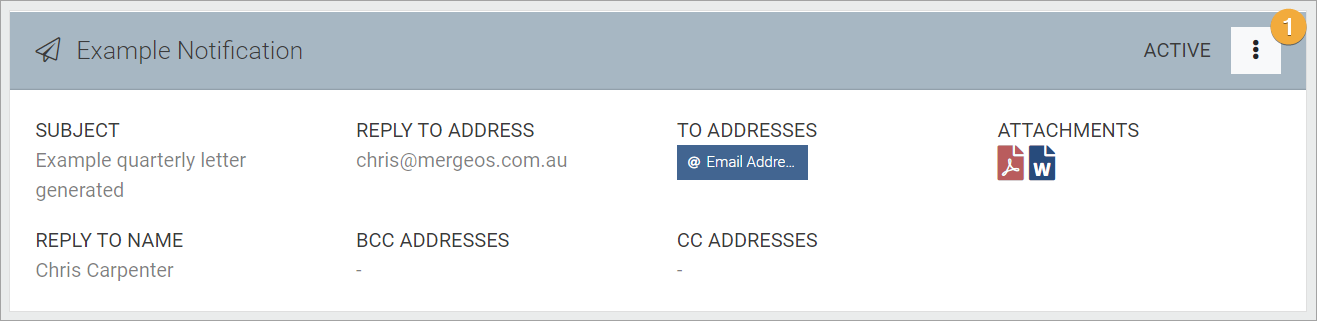
Email Notification Summary After setting up a notification, a summary of of it will display on the page.
Step 5 - Review
The review step gives you a quick overview of your project and all the configured steps.
Project Review Step
Click on the edit icon next to any step to go to the configuration page for that step
Problems with Projects
If there are any problems with the configuration of the project, they will be summarised on this screen.